
In the previous video Fun with Arduino 04 we switched just one LED on and off as an example, but we actually want to switch the street lights on our layout. Suppose these are 20 white LEDs, which we also like to burn quite bright so they each draw a rather high current? No way we can connect those to our Arduino directly … we need something in between.
Read on below the video …
A couple of easy to use modules that are capable of switching higher currents are available, tailored for use with the Arduino. One is the relay module which can be had with 1, 2, 4 or 8 relays on a board. The other is a power FET module. (A FET is a special kind of transistor (Field Effect Transistor) that is often used in switching applications). Scroll all the way down for links where these can be bought.

When to choose a relay, when a FET? Both can be used, but there are some differences:
- The relay module can switch AC up to 250V 10A. It’s a mechanical switch, it makes an audible click.
- Arduino FET modules mostly are specified for DC up to 24V 5A. It’s an electronic switch, it makes no noise. They can operate at very high frequencies, which make them suitable as a dimmer for a LED strips (Pulse Width Modulation).
How to connect multiple LEDs? If we use a 5V DC power supply and if our LEDs have a 3V voltage drop, we can not connect them in series, we need to place them in parallel.

The way shown at the left generally is not a good idea. Although it might work if you try, due to tolerances chances are that one LED will draw more current than the others and they will burn with different brightness. Also, the resistor gets the combined current of all LEDs together, which can become too much for a standard 1/4 W resistor, it may get hot, you’ll probably have to use a higher wattage resistor. All this is avoided if we use one resistor per LED as shown on the right, this is the way to go.
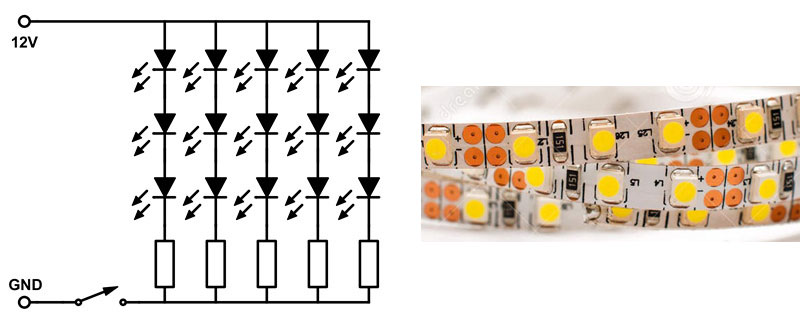
If we use a 12V power supply we can place 3 LEDs in series with one resistor. This is often seen on 12V LED strips.
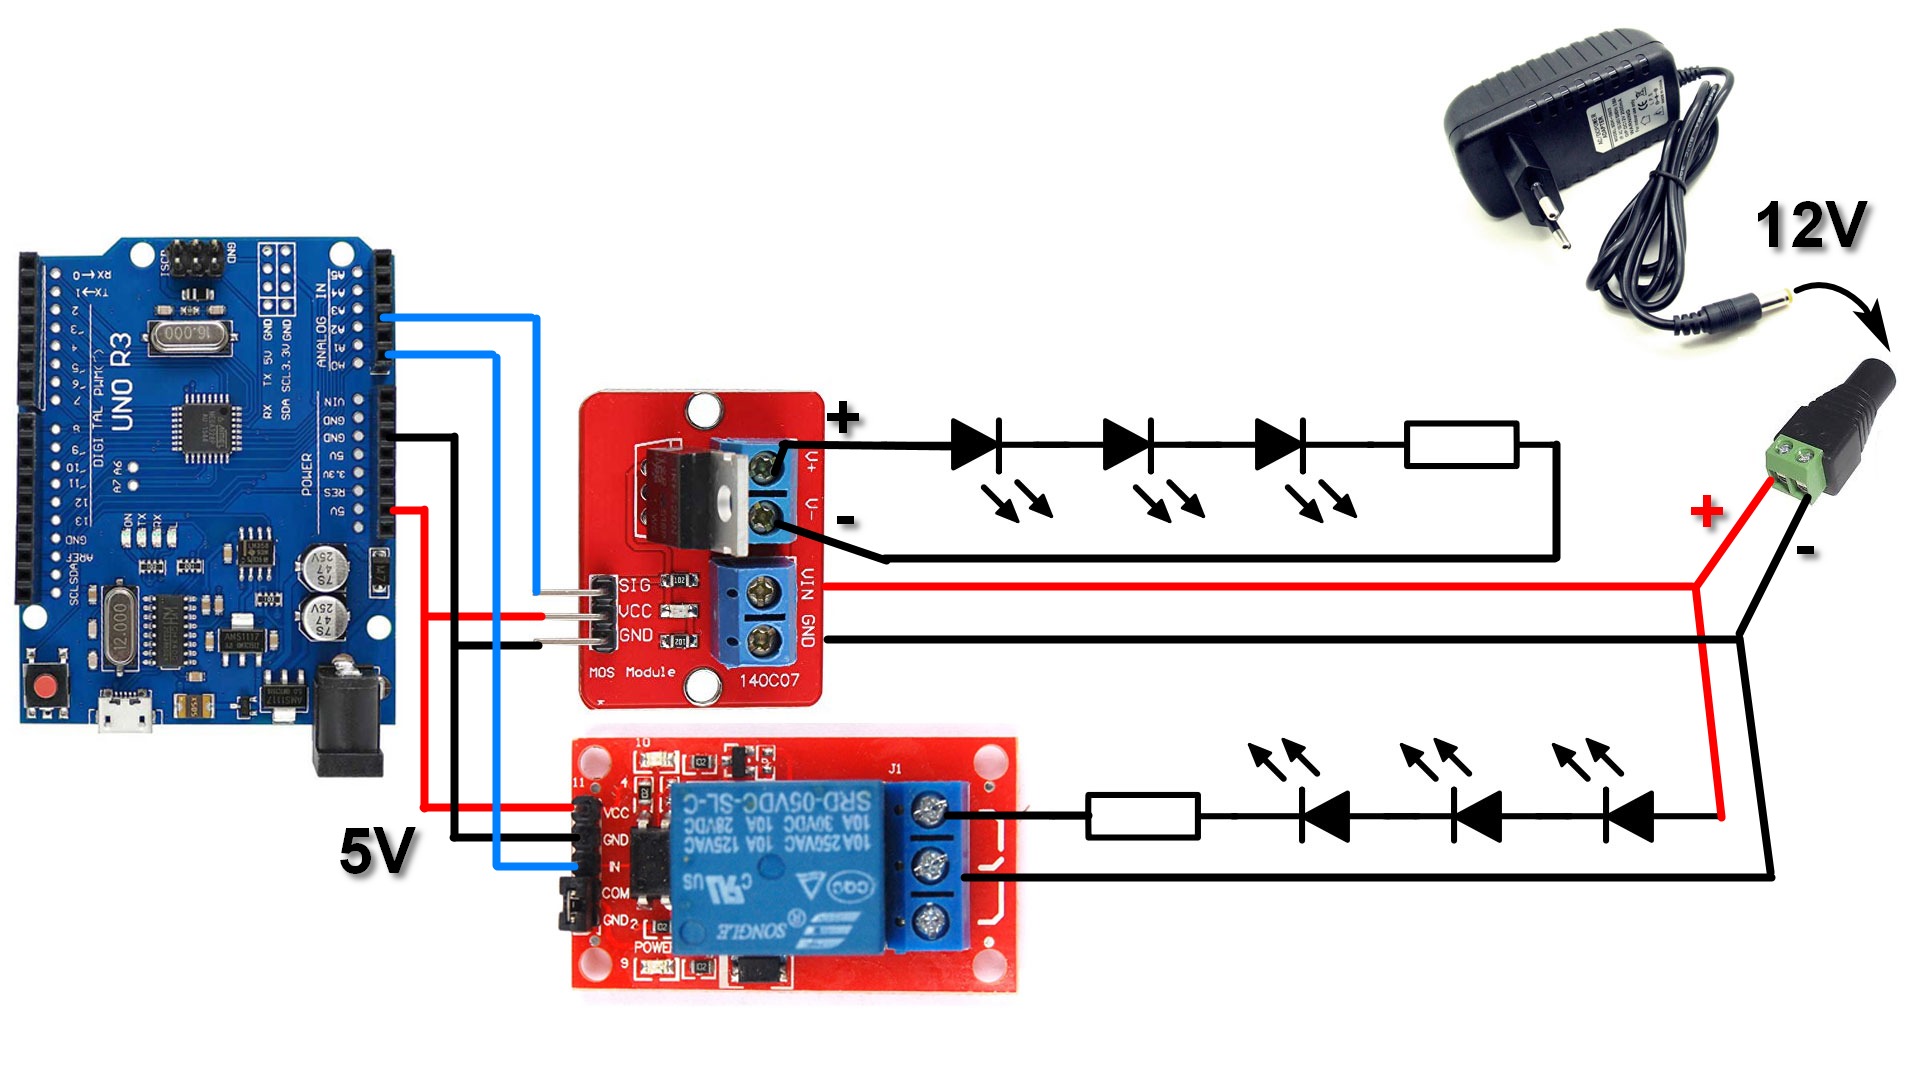
The image below shows how the Arduino, the relay or FET and the LEDs can be wired (click to see the enlarged version):
Links where the items in this article can be bought:
- FET module
- Relay module
- Dupont wires for the interconnects (get all 3 types, male/male, male/female, female/female)
— 0 —

Do you know that Mardec is the best way to realize projects using relays and FET modules.
http://www.Arcomora.com/Mardec
LikeLiked by 1 person
Hello, this tutorial was incredibly helpful. Thank you so much.
I have one question. Using the parallel configuration and the MOSFET Module and a 5V power supply, is it safe to connect the 5 LEDs as shown in the right picture? Or I should try with less? In my application I need a small amount of light from the LEDs 🙂
LikeLike
That’s perfectly safe, the FET module is capable of delivering more than enough current to feed even 100 LEDs. If you want dim light, use a larger resistor to limit the current.
LikeLike
Thank you for your fast and helpful reply! I will surely do that ! 🙂
LikeLike
Hello friend, I am using the Raspberry Pi for this project of mine. As presented in here with the multiple LEDS. Is it possible to skip the 12V supply part and connect only the VCC on the FET module to my Raspberry Pi? (not use Vin port on the module just the Vcc one) Or is mandatory to have second supply? I wanna use less than 10 LEDS, and not strip presented in video.
Please know I am very new to this hobby and any help and guidance helps a lot. Thank you my friend!
LikeLike
A separate power supply is only needed if the current needed for the load, in your case the LEDs, exceeds the max allowed current of the Pi. You’ll have to check the Pi specifications.
LikeLike